

Never crocheted before? Excellent, you’re in the right place. Especially if you’re a woolly-liberal-snowflake type like me.
This tutorial will get you from zero to pretty snowflake without boring you to death, and while teaching you approximately 50% of everything about crochet. And when I say zero, I mean I’m assuming you know pretty much nothing about crochet.
(A note on ambiguity: actually, if you’ve literally never crocheted before, you will find that some of what I’ve written doesn’t leave you very sure of what to do. I *could* have written 10 times more so as to cover ALL potential sources of confusion, but then nobody would read this. So be prepared to plough on regardless if you are confused. Often that practical experience is the key to understanding what you’re doing and learning to sit with that frustration and not let it stop you is a key skill for crafters!)
Lets take a quick look at the anatomy of this crochet snowflake. It is crocheted in four stages, starting with a ring in the middle and then each “round” is crocheted into the last.

This is as distinct from flat, square crochet you may have seen where you start with a linear base and then work back and forth like a printer. Crochet is very adaptable, it’s just loops being hooked through… well, anything, really. Once you figure out how it works, you can go nuts and crochet any shape.
Please note I use American terminology because, let’s face it: they’ve won. Just know there are two annoyingly similar lexicons of crochet terminology, US and UK. Know which one a particular pattern is using and look up what the terms mean. Here, I am using US and will explain each stitch.
You’ll need a crochet hook and some thread or yarn. You can use size 10 crochet thread and a 1.75mm hook if you like being told what to do, but it’s more important that you just start, so if you have something else that’s fine. Ideally the hook and thread should have a size-relationship that looks something like this:
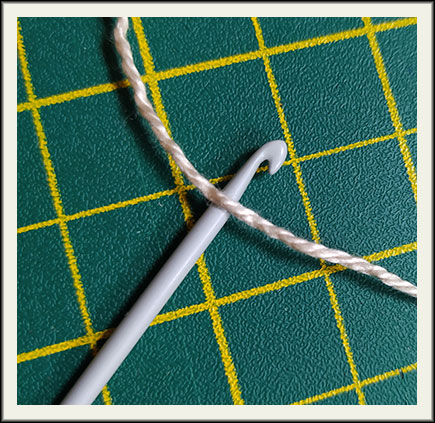
But honestly, you can do it with anything. Here are some I did with different hooks and threads. I’m using the big stuff for this tutorial so you can see what’s going on.
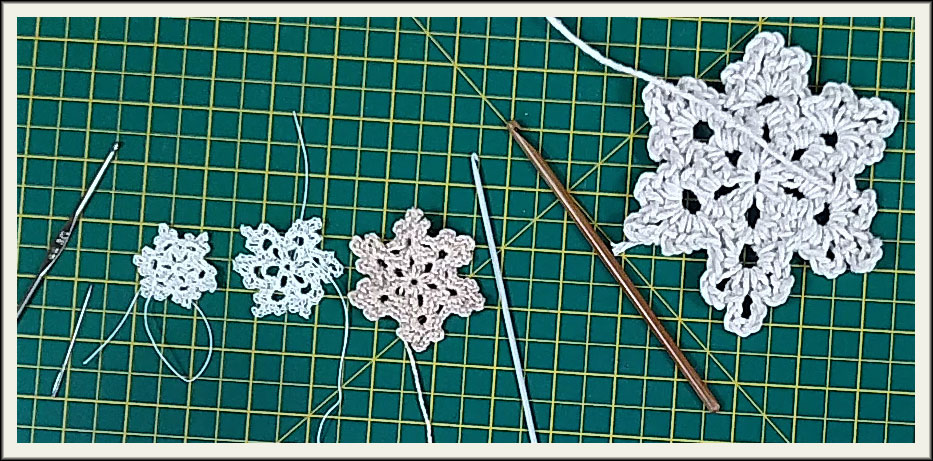
The above right was done with kitchen twine and a 5mm hook, and would make a nice coaster, so really, anything is fine.
I do recommend avoiding thread or yarn which splits easily; you’ll have trouble pulling the hook through. Choose something reasonably tightly twisted instead.
If you’re right-handed you will probably hold the hook in your right hand and do everything else with your left. If you’re left handed, you’ll have figured out how to adapt right-handed instructions by now.
Start by making a slip knot in the end of your yarn.
Put the hook through the loop of the knot and tighten it.
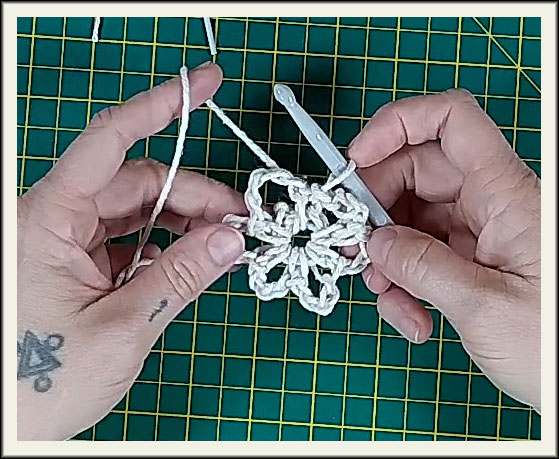
Now you need to set up your left hand to do three things: brake, tension and holding the work.
Your pinkie is the brake. Your index finger is the tension-maker and your thumb and any spare fingers can hold the work while your right hand gets on with pulling the hook about.


Get into this working setup like this:
Practice that hand movement a few times; you will be doing it a lot.
Part 1: Making a Loop
Yes, sorry, all that was not even part 1 yet. But you’re about to actually crochet. Have a look at this clip:
Several things happen. My left hand thumb and second finger hold the knot. My tension finger and the hook do a “yarn over” by wrapping the yarn clockwise round the hook. And lastly I use the hook to pull the yarn through the loop. That’s called a chain stitch, and what I just did is sometimes called “chain 1” . And if you’re watching carefully, a couple of times during that process, my brake finger and tension finger adjust to let some yarn through or pull it tight or whatever’s needed. That stuff feels awkward and difficult at first but becomes second nature after a while.
Now do another three chain stitches for a total of four.
You can count stitches like this:

The tear-drop shape is considered “the stitch” for both counting purposes, and when you have to crochet “into” a particular stitch. Although sometimes it’s woolier than that, like now…
I’m going to join these four stitches into a ring by doing a stitch (called a slip stitch) into the first of my chain stitches.
So I put the hook through some bit of the first chain stitch (it’s not crucial exactly which part), do a yarn over and pull the yarn through that bit of chain, and then also through the stitch that was sitting on the hook.
A slip stitch just serves to tie down the bit near the hook to a bit somewhere else, in this case forming a ring that is going to be center and base for the rest of the stitches. If you fiddle with the resulting mess, you should be able to identify a hole in the middle of the ring.
This is the ring in the middle, into which we are about to crochet the six loops of the next “round” which will look like this when it’s finished:
And here’s how we do it.
Part 2: Round 1
(sorry, this chapter naming convention was ill concieved…)
Ok, we need a “single crochet” into the ring. So take your needle and poke it through the big hole in the middle of the ring, pick up the yarn with a yarn over and draw it through, so that there are two loops on your hook, and then do another yarn over and pull the yarn through two loops.
Those two steps together constitute a “single crochet” stitch.
Now do four chain stitches away from the base of the work.
And then put the hook through the base ring again for a second single crochet, much like the first, which will now have formed the first of the six loops we’re trying to make.
If you look closely, you’ll see I’m holding that extra bit of tail from the initial slip knot in such a way that I’m sort of tying it down with that last single crochet. If I keep doing that each time I add a single crochet into the loop, it’ll save me having to weave that end in as a last step. But don’t worry if you just leave yours flopping out, we’ll sort it out at the end.
Having made one loop, we need to make five more. Four of them are made pretty much the same as the last one: chain four and single into the original ring. If possible, include the yarn tail in the “ring” so you’re tying in a bit of tail each stitch you add.
For the final loop, chain four and look for the first single crochet you made into the ring at the beginning of this round. You’re going to slip stitch into the top of this single, so jab through, yarn over and pull the yarn through both the jabbed stitch and the original loop on the hook. It’s not hugely important exactly where you connect; if it looks crap do something different next time. I often just sort of blindly jab the hook through a lump rather than carefully choosing a spot. But here’s a guide:
I would say it’s fairly important to duck under at least two strands rather than just one. If you only go through one, it can end up looking like a little stringy gap.
And you’ve got your six loops in a sort of daisy shape. Well done.
The next round is going to add some body to these loops and also add an additiona loop on the tip of each one, and end up looking like this:

Part 3: Round 2
We are going to do, into each of the daisy-petal loops, two singles, four chains and two singles.
Start by doing two singles into the first daisy-petal loop, just to the left of where you did the slip stitch to join the last daisy-petal.
Then chain four and do another two singles into the same petal, so you’ve sort of beefed up the petal loop, and added another loop at the tip of it.
You just repeat that: two singles, four chains and two singles, in each of the next five petal loops. When you get back round to the first one, slip stitch into the top of the very first single you did at the beginning of the round.
In the third and final round, you’re going to add a bunch of picots (little bobbly bits) to the tip of each loop, so it looks like this:

Part 4: Round 3
Start, as with the last round, by doing two single crochets into the loop to the left of the needle position; the one on the tip of the first daisy petal loop.
Then chain 3 and single crochet into the same loop.
Then chain 5 and single crochet into the same loop.
Then chain 3 and single crochet *twice* into the same loop.
So, in that one loop on the tip of the petal, you’ve done two singles, three chain, one single, five chain, one single, three chain and two singles. You might have to smoosh the stitches to the right if they are getting a bit crowded.
You can move right on and do the same pattern in each of the other five petals, and when you get back to the start, as you have probably guessed, you slip stitch into the first single crochet you did on this round.
Cut the yarn with about 8 or 10 inches to spare and pull it through.
Thread the tail onto a needle and snake it through some of the previous round’s stitches for a bit of security; if you cut it right at the knot, it’s likely to come loose.
I would typically wait til after blocking to trim the tails, just in case the pulling them about might loosen the knots.
Part 5: Blocking and Stiffening
Blocking, and optionally stiffening, your crochet helps it achieve and maintain a nice shape. Unblocked crochet can be, as you’d imagine, a bit droopy and floppy. With a big piece like the above, I’d block it by wetting it thoroughly, pinning and shaping it onto a piece of stiff foam, and letting it dry.
With smaller, daintier snowflakes, it’s important to stiffen them. I use startch, which is messy and a bit of a production, so I wait til I’ve crocheted at least half a dozen snowflakes before I bother.
There are lots of ways to stiffen but I like good old-fashioned starch.
For these I mixed a heaped teaspoon of corn starch (corn flour to the Brits) with half a cup of water. You don’t have to be very exacting, anything in that general ballpark will do.
I smooshed out all the lumps and then stirred it constantly with a silicon spatula over medium heat until it had thickened and gone translucent.
Pour the gloop into a bowl and take it to your blocking station. I use a bit of some foam play mat for babies I bought at Lidl a very long time ago. Any bit of old yoga mat will do, though, don’t buy something special if you can help it.
Put each of your creations in the gloop and mash it around til it’s thoroughly soaked and covered. Then use paper towels or similar to remove the majority of gloop. The amount you can’t remove that way is what will dry and stiffen the snowflakes.
Then use stainless steel pins (most modern pins are stainless) to pin the snowflakes out into nice, symmetrical shapes, with all the picots differentiated and whatnot. Fettle until you are satisfied.
With the big kitchen twine versions, I just wetted them thoroughly and laid them out without pins, so they won’t stiffen but they will relax into the right shape.
And after letting them dry completely, carefully taking the pins out and checking them over, you can stick them on a loop of ribbon or string and you’re done.
The kitchen twine ones were stiff enough to hold their shape without starch. The little ones turned out stiff enough to hold their shape but not crispy. They need to be kept quite dry from now on, obviously, but if it comes to that, you can always rinse out the starch and do it again in a few years when they’re looking a bit rough.
There you have it. Happy crocheting.