
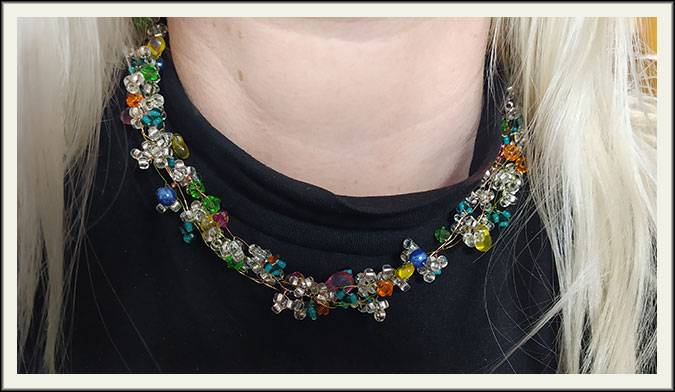
Some days, especially as dark, rainy Yorkshire winter sets in, I just need to spend some time playing with beads. Cheerful, colourful, happy beads.
Today I made a bead and wire necklace, not dissimilar to the one in my portfolio, but this time I documented it for your benefit, in case you, too, need some bead-time to cheer yourself up.
So yeah, some tutorials are What-You-Should-Do tutorials, and some are What-I-Did tutorials, with notes on what I would do differently next time, because I was just making it up this time. This is one of the latter. Feel free to riff off the general gist.
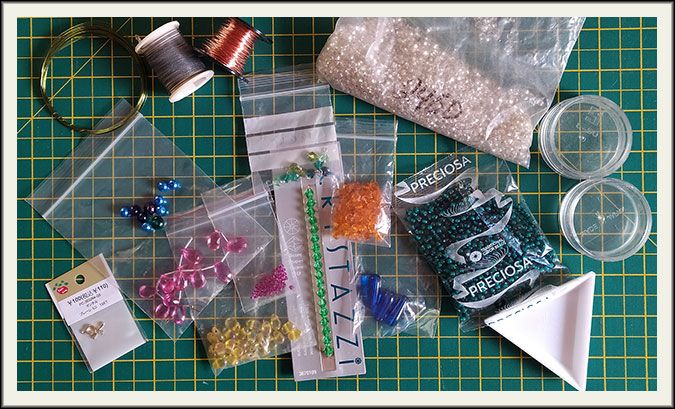
I started by raiding my bead drawers for a nice selection of bright jewel colours. I used some large seed beads, some drop beads, some crystals and some pearls. It doesn’t really matter, just go with what you’ve got and what you think looks nice together. I also chose some clear large seed beads as a sort of background “colour” to avoid the bright beads being overwhelming. But it’s all just design judgement, anything goes with your project. Do something you think will look good, because that is all that matters.
Also pictured here are some pots for holding the beads while I spear them, a clasp (any kind will do, or just some ribbon for tying if you don’t have a clasp) and three kinds of wire, just to illustrate that you can use any thin wire, whether it’s specifically craft wire, or just the insides of old cables. Thin copper craft wire is ideal but just use what’s available.
I started by pulling two lengths of about 120cm each of wire off the rolls, one green and one copper (unnecessary, on reflection; use just one colour) and then instantly regretting that I didn’t straighten the tightly coiled copper wire a bit while I was uncoiling it, as I ended up with the tangled slinky effect and spent quite some time detangling.
Here’s how to straighten coiled wire slightly so it doesn’t tangle as much:
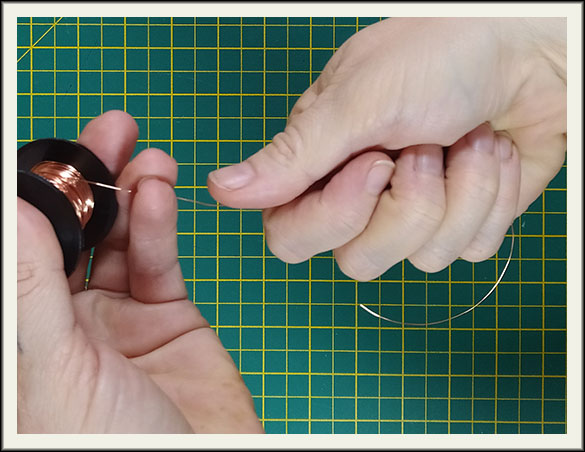
As you take it off the coil, straighten sections of about 30cm at a time so the end doesn’t have a chance to go full slinky. Run the length of the wire gently through your hand and over your thumb to slightly counter-curve it. It won’t end up straight but it will end up a lot straighter than coiled, and that might be the difference between “dammit” tangling and “I *&$%@* HATE EVERYTHING” tangling.
Ok, so I had two lengths of wire, which I cut with my rubbish, anything-goes scissors, *NOT* my fabric scissors, you heathen! I found the approximate halfway point and bent them double around a knitting needle, twisting the end into a loop with about a cm of twist.
This loop can be attached to one side of whatever clasp you’ve got (or tie a bit of ribbon to it) in whatever way makes sense. Jump rings are great! But I didn’t use one. I had a tiny T-bar and circle clasp which I fed onto the loose ends of the wire and then fed those loose ends through the loop I’d just made and squashed and twisted the whole lot into a messy, but secure, blob. Anything that makes it secure and doesn’t leave wire ends sticking in your neck is fine, just make it up.
Then separated off one of the strands of wire and started adding the clear seed beads, three at a time, running them down to the clasp end and twisting little clusters of three at about 1cm intervals. Sorry, I was a bit rubbish about making this bit clear on the video, so there’s an illustration below to help.

So each group of three is positioned a little distance from the last and made into a little loop before being twisted three or four times to make a series of little florets.
I then did the same thing on each strand, sometimes with seed beads in little florets, sometimes with bigger beads twisted singly, at intervals of about a centimeter, until all four strands had a few cemtimeters of beads.
In retrospect, if I had it to do over again, which I inevitably will one miserable, drizzly day soon, I would leave a bit more space between clusters for a less dense, more airy effect. But it’s your call what you do with yours.
But having set the density, I kept it steady and just added more beads to each strand in random order, keeping the balance about 3/5 clear beads and 2/5 coloured beads. Because I didn’t want the necklace to be four separate strands, but more of a (neatly) tangled mess, I experimented with trying to gently braid the four strands a bit as I went along, but I ended up just occasionally twising any given two of them together at intervals.
Inevitably, as the necklace got to not-quite-half as long as I wanted it, it became clear I was going to run out of wire length and have to add more. As one wire came to about 10cm from running out, I cut another length from the reel, about 50 or 60 cm long, and spliced it to the running-out end as follows:
I held the running-out end and the freshly cut, new end together to feed a cluster of three seed beads onto both at once and twisted that cluster on the double-wire. That left me with two short ends, one of which I twizzled round the base of the same cluster I’d just made, and cut it as short as possible, trying to tuck the cut end up into the cluster as much as I could to avoid it snagging in future. The second short end I took back to the previous cluster, just to avoid one cluster looking too fat in the stem, and did the same thing, wrapping and cutting short. That left me with a fairly subtle looking, very secure join and the long end of the new wire to be going on with.
There are hundreds of ways you could splice in extra wire, or you could go back in time and start with much longer bits in the first place and avoid it altogether. But this worked pretty well. If you end up doing something you think works better, power to your creative process!
Moving on: three more instances of splicing aside, the rest was just repeat, repeat, repeat until the necklace was the right length.
And lastly, to figure out a way to attach the other end of the clasp neatly. Well, as neatly as was appropriate with this slightly chaotic design.
I ended up twisting about a centimeter of twist into the base of the four working ends and then feeding all four ends through the toggle bar’s loop, and bending it back to form a loop. I wrapped one of the dangling ends around a floret, just like I had with the splices above, and then decided I needed to twist the loop closed a bit more to avoid the toggle wandering around too much. Then I just bound off the other three loose ends and cut them short.
In retrospect, I wish I’d left just a little more room for the toggle clasp to make it easier to open and close, but it works fine as it is. And making this necklace did its job of cheering me up and getting me through a grey winter day, so I’m not that fussed about little awkward bits going wrong. If you are having a go at this, I hope my explanation of my process is helpful, but also I hope you’ll just make up any bits you are unsure about. Your judgement and creativity are up to the task of filling in any gaps I’ve left in my explanation.
I wish you a cheerful afternoon of beadwork. Send me pictures.